
PoseidonMarine® Trim ram rebuild kit Volvo Penta SX DP-SM OMC Cobra 3854247 3885196 3857470
High-quality marine engine spare parts.
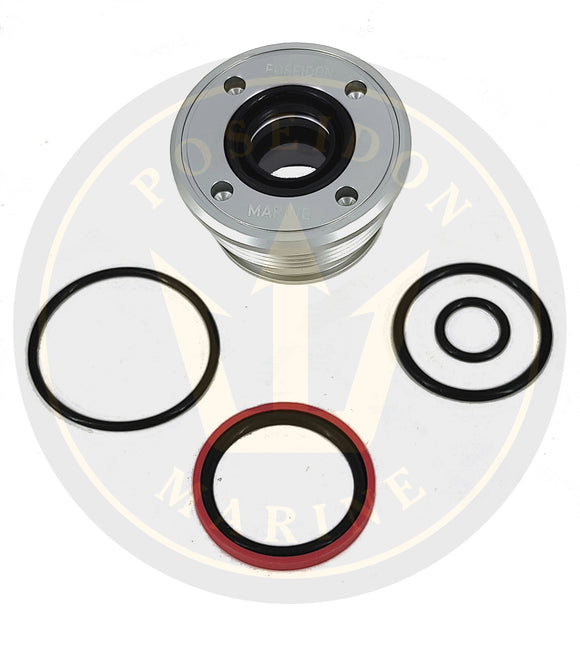
PoseidonMarine® premium-quality trim ram cap kit for Volvo Penta:
- SX-C, SX-R, SX-S
- SX-MLT, SX-MACLT
- DP-SM
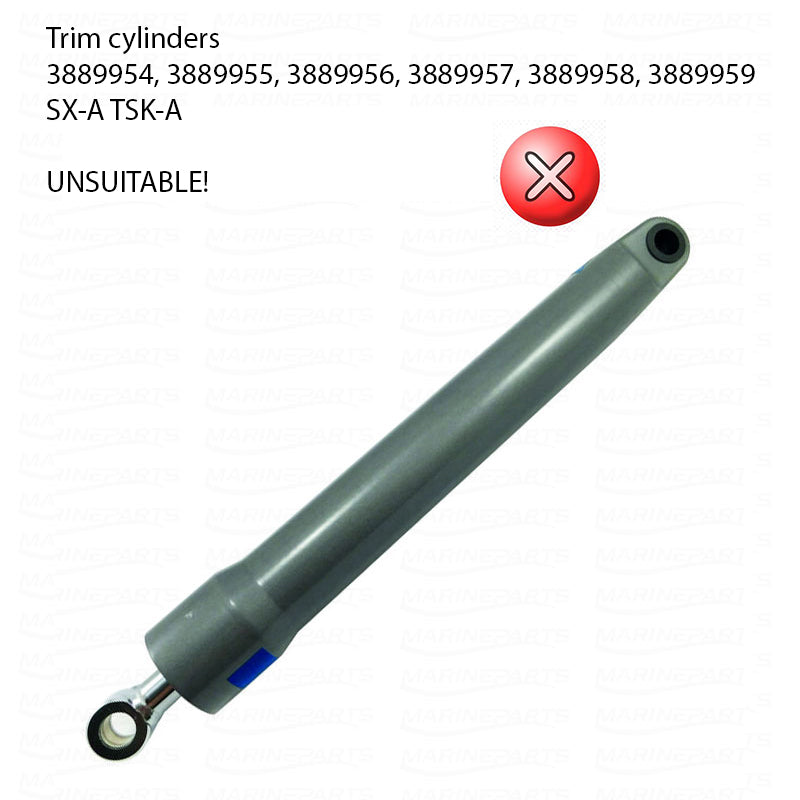
Please observe the pictures. The last picture shows the only cylinder of the SX series (SX-A) that this kit will not fit.
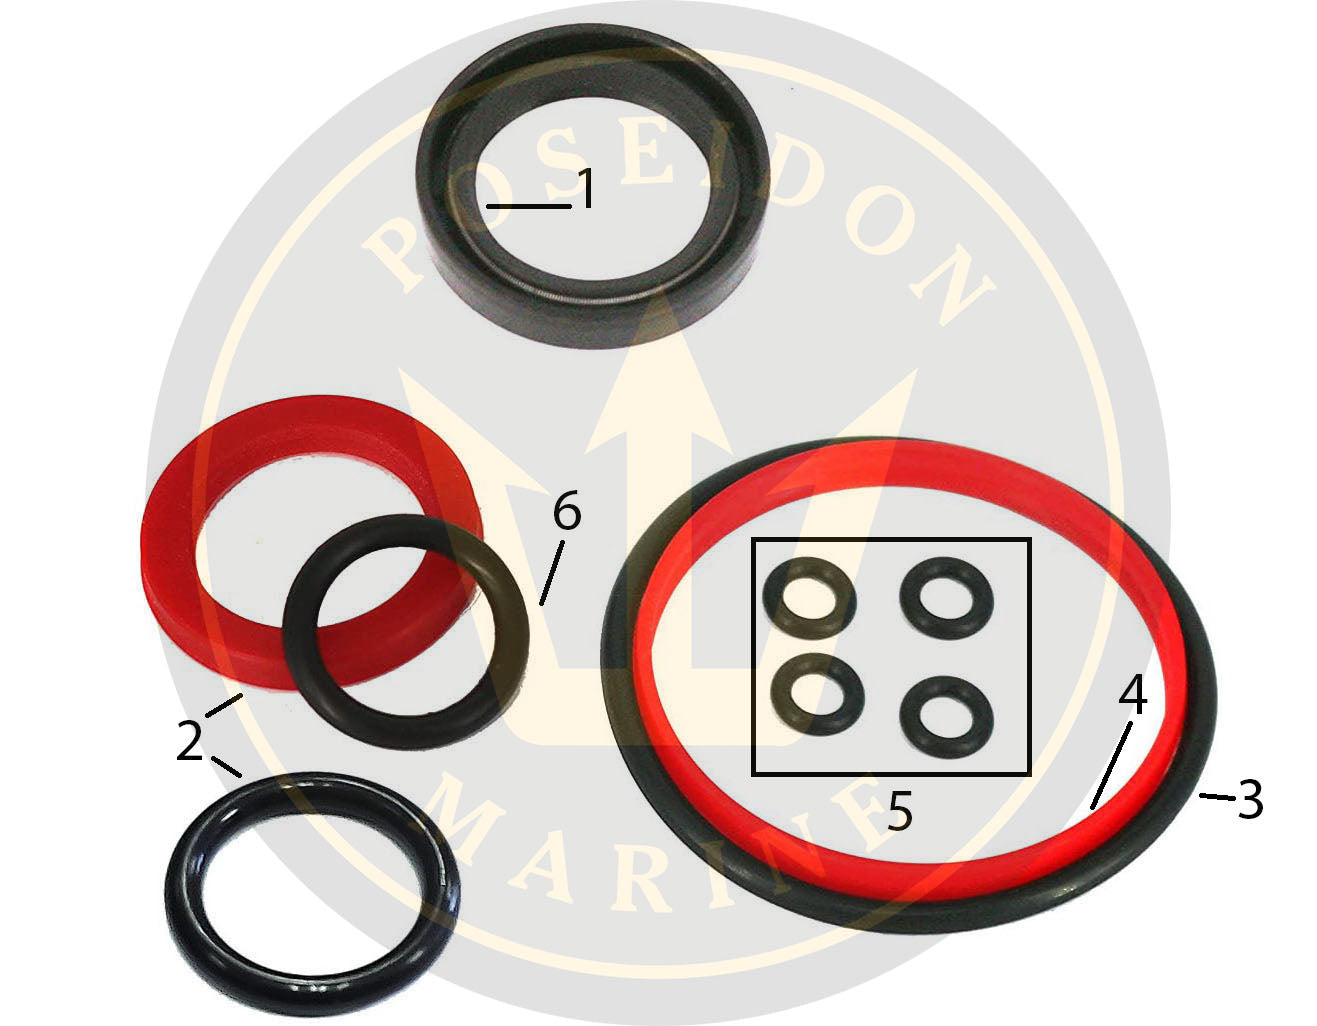
PoseidonMarine® trim ram cap kit comes with dust and pressure seal, bidirectional ring, o-rings and a new cap. The cylinder assembly is used only for guidance and is not included.
There are similar repair kits on the market that are faulty in design, using wrong thread that may damage your cylinder threads. Other kits use inferior sealing materials that fail prematurely. Our kits are designed without compromise on the quality. Additionally, we improved the material of the bidirectional seal so that installation is easier and durability is highly increased.
This kit includes:
- Seal kit 3854247
- Trim ram end nut
One kit repairs one cylinder.
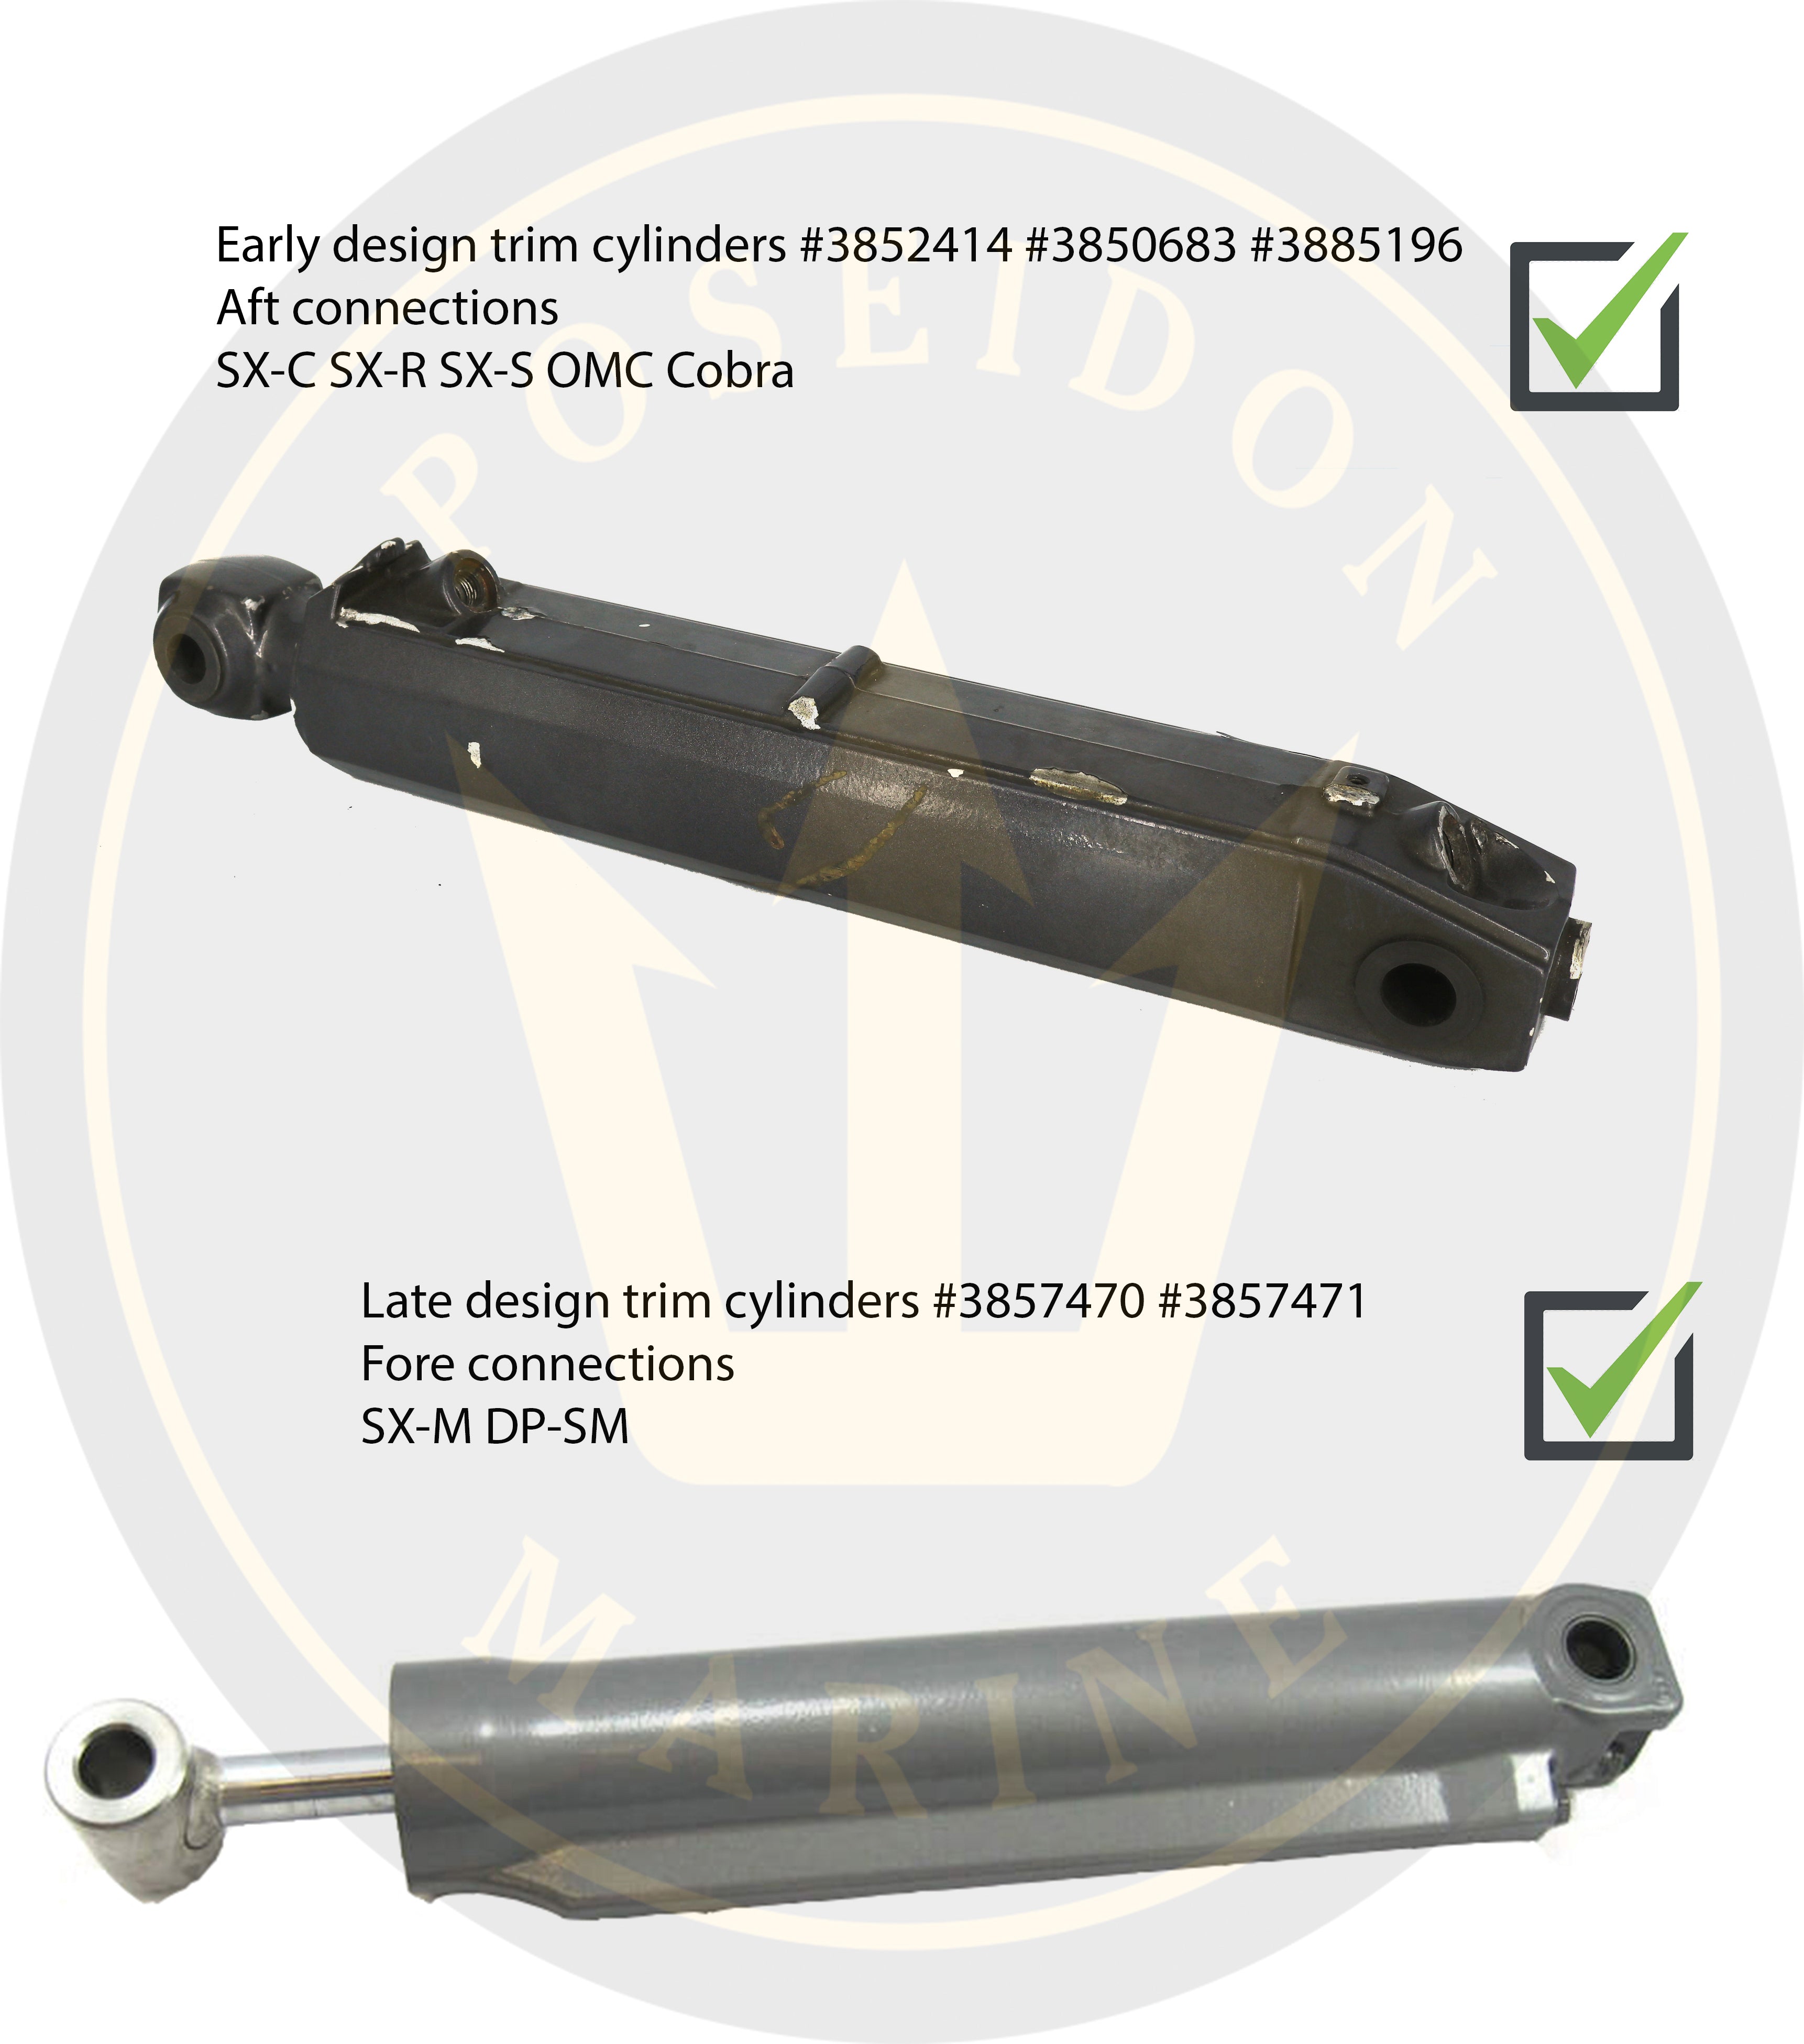
This kit will fit the following cylinders:
- 3852414
- 3850683
- 3885196
- 3857470
- 3857471
Suitable only for single propeller SX drives and DP-SM (this is a DP drive)
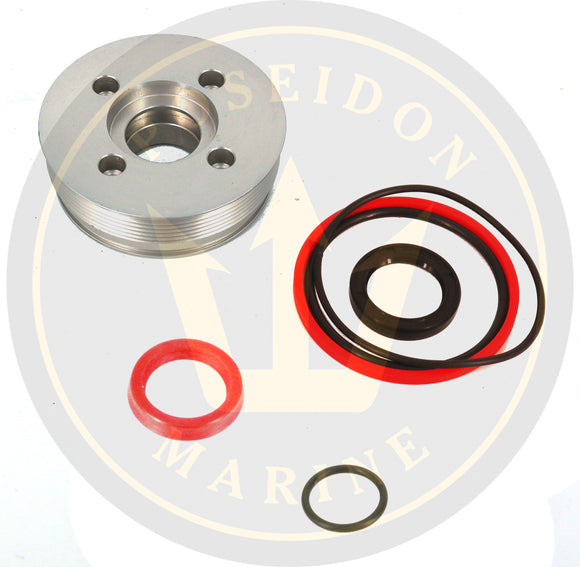
Seal kit content:
1- Trim cylinder dust/scrapper seal.
2- Hydraulic seal. You can use the "original" o-ring style if you are unable to place the seal.
3- Cap back-up o-ring.
4- PU integrated piston seal, which replaces the split rings.
5- Trim line o-rings.
6- O-ring between the bolt and the piston.
Revisions:
- The obsolete split rings and o-ring application have been replaced by a redesigned integrated composite ring.
- The sealing o-ring inside the channel has been replaced by a proper hydraulic seal.
PoseidonMarine® Trim ram rebuild kit Volvo Penta SX DP-SM OMC Cobra 3854247 3885196 3857470
This product replaces the following manufacturer's part nr:
- Volvo Penta: -
- OMC: -
- SLP: RK-5196, RK-5197, N-5197
- Recmar: -
- PoseidonMarine order number: PMKITSX
The references that are listed here are trademarks that apply to the respective trademark owners. The references are used only for a reference purpose. Our product is compatible with these reference numbers. Please note that our product is an aftermarket product (non-OEM), unless otherwise stated.
How to Repair Trim Cylinder Volvo Penta SX DP-SM OMC Cobra 3854247 3885196 3857470:
-
Removal of your Volvo Penta SX/ OMC Cobra trimming cylinders:
- The plastic cap on the aft (drive) end of each trim cylinder should be removed. The lock nut and flat washer should then be removed. On certain 1998 units, the nut may have been replaced with an e-clip; if so, the clip and flat washer should be removed from the rod.
- The hydraulic cylinder should be supported, and the pivot rod lightly tapped out of the cylinders with a rubber mallet. One side should be tapped while the other side is pulled. The cylinders should then be carefully lowered until they rest against the spray plate. If the bushings are removed with the pivot rod, the two grounding clips should be kept.
- The pivot ends of each cylinder should be grasped and pulled out to the fully extended position. The manual release valve (on models so equipped) should be loosened, and the filler plug at the reservoir should then be removed to relieve any residual pressure in the system. The valve should be closed and the cap installed. On later models without the release valve, one of the hydraulic hoses at the pump should simply be loosened, and the reservoir cap should then be removed, but a shop towel should be placed over the cap and hose connection, as some spray may be present.
- At the forward end of the cylinder, the bolt should be unscrewed and the ground wire disconnected. The cylinder cover retainer should be removed, and the cover lifted off. These models will also have a small screw and line retainer over the hydraulic line running to the aft end of the cylinder; these should be removed as well.
- With the stern drive still in the full DOWN position, a suitable drain pan should be placed under the hydraulic lines. The two hydraulic hoses should be tagged and disconnected from the end of the cylinder (covered with a rag) using the correct size "Flare Nut" or "Line Wrench". These wrenches are used to prevent damage to the hex flats on the line or hose fittings if they are extremely tight or if slight corrosion has built up on the fitting. Most standard open-end wrenches will flex under high torque loads, causing slippage and damage to the hex fittings on the hydraulic line.
- The O-rings on the end of each line fitting should be removed. Plugs should then be installed into the hoses or fittings to prevent draining the trim & tilt hydraulic system more than necessary.
- The plastic pivot pin cap on the end of the forward pin should be pried off or unscrewed. The locknut should be removed or the E-Clip should be pulled from the end of the pin, followed by the flat washer and bushing, which should be slid off the pivot pin.
- The pivot pin should be pulled out of the cylinder and gimbal ring, or the cylinder should be grasped on the inside of each pin and pulled off the anchor pins. The flat washer and bushing on the inside surface of the cylinder ends or anchor pins should then be removed. -
Dismantling of the hydraulic cylinders:
- The trim cylinder(s) should be removed as previously described.
- The cylinder should be held over a drain pan with the hydraulic line ports facing downward into the pan; the cylinder should then be extended and retracted 2–3 times to remove all fluid.
- The pivot pin bushings should be removed if replacement is intended.
- The cylinder should be placed in a vise equipped with soft jaws and carefully tightened. Alternatively, it may be wrapped with a cloth.
- A spanner wrench (#912084) or equivalent tool should be obtained. Removal of the end cap is difficult even with the special tool, so care must be exercised. The tangs of the spanner should be inserted into the holes in the end cap. If needed, a long breaker bar can be slid onto the tool so that the bar remains in the same plane. This position provides maximum mechanical advantage. The end cap should be removed. The breaker bar may be tapped, if necessary, but keep in mind — if the holes in the cap become damaged (elongated), a new cap (PMKITSX) will be required. The end cap should be unscrewed until it is held by a single thread. The rod should be extended, and the end cap and piston assembly should then be fully removed.
- The piston rod should be thoroughly cleaned and degreased, then installed in a vise using a rod holder (#983213). The pivot pin should be carefully inserted through the hole in the end piece, and the end piece should be spun off the rod. If the end piece cannot be loosened, the shank may be carefully heated with a torch or heat gun and the attempt repeated. If the piston rod slips in the holder tool while removal is attempted, a piece of paper should be wrapped around the rod before it is inserted into the tool.
- The end cap should be pulled off the end of the rod, and the scraper should be removed using a small screwdriver. The two O-rings — one inside and one outside — should also be removed. The scraper and O-rings should be discarded.
- At the end piston, the two split rings and the O-ring should be removed, and all components should be discarded.
- There are no serviceable components in the assembly, so no formal service procedure is available. That said, if impact valve leakage is suspected, a quick procedure can be attempted before full replacement. The piston rod should be reinstalled in the holder tool and the large bolt at the end of the piston should be loosened just enough to allow the relief check balls to unseat, but not too much. The piston components should be cleaned with solvent and blown dry using compressed air. The bolt should then be securely tightened to seat the balls. These bolts are 7 mm. -
Assembling the hydraulic cylinders of Volvo Penta SX-C, SX-M, and OMC Cobra:
- An effort should be made to keep the work area clean, because any contamination on the piston could lead to a malfunction. The interior of the cylinder should be inspected for any signs of scoring or roughness. All surfaces should be cleaned with a safety solvent and blown dry with compressed air.
- If any signs of corrosion or damage are found on the piston, it must be replaced with a new unit.
- If a PMKITSX is being installed, the next step should be followed. The end cap threads should be cleaned with a wire brush until all traces of old sealant have been removed.
- All O-rings and interior components should be lubricated with Power Trim Fluid.
- A new scraper should be positioned over the end cap so that the lip is facing downward, and then a small seal installer (#326545), or an appropriately sized socket, should be used to press the scraper into the cap.
- The new O-rings should be coated with fluid and then installed into their respective grooves inside and outside the end cap.
- A new piston O-ring should be coated with fluid and rolled into place in the recess in the piston. New split ring retainers should be positioned on each side of the O-ring so that their ends match but do not overlap. As the rings are quite fragile, care must be taken when they are installed into the recess. Alternatively, if the integrated ring is used, the process will be made significantly easier.
- A seal protector tool (#326005) should be installed over the end of the piston rod, and the end cap should be slid on. It must be ensured that the rod, O-ring, and cap are thoroughly lubricated with hydraulic fluid.
- It must be ensured that the piston rod threads are free of all old sealant, and then Loctite Primer should be sprayed on the threads. While the primer is drying, the rod should be secured in the holding fixture again, and the threads should be coated with Loctite. The end piece should then be screwed on and tightened securely. The rod and tool should be removed from the vise.
- The cylinder should be reclamped in the vise, and the cylinder bore and piston should be thoroughly coated with fluid. The piston body should be grasped and fed into the cylinder bore. The piston and rod should be pushed into the cylinder. Once the piston is fully inserted, the hydraulic line ports should be capped, and the cylinder should be filled with as much hydraulic fluid as possible.
- The end cap should be slid down the rod and threaded into the cylinder. The spanner wrench should be installed and tightened to 25–30 ft-lbs (34–41 Nm). Once there, the end cap should be rotated further until the two holes are aligned with the pivot pin hole in the end piece.
- The cylinders should be attached, the fluid level in the reservoir should be checked, and the drive should then be cycled through its full range of motion 5 times to purge any remaining air from the system. -
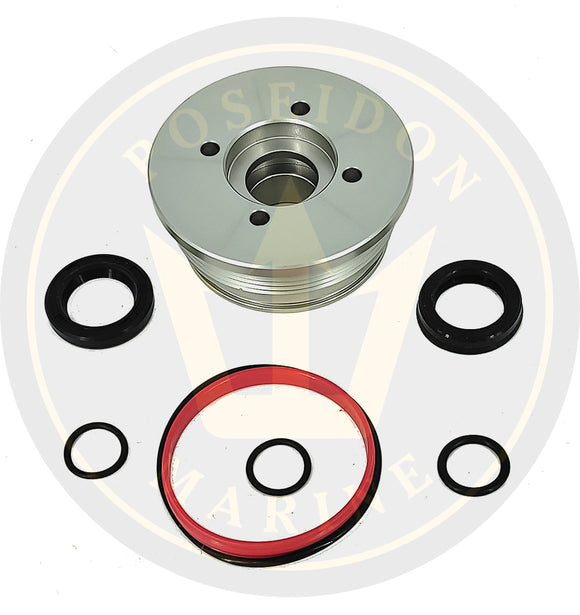
Poseidon Marine’s trim ram seal kit, whose original reference is 3854247, includes the following parts:
- One piston bolt O-ring 2.6mm X 19mm.
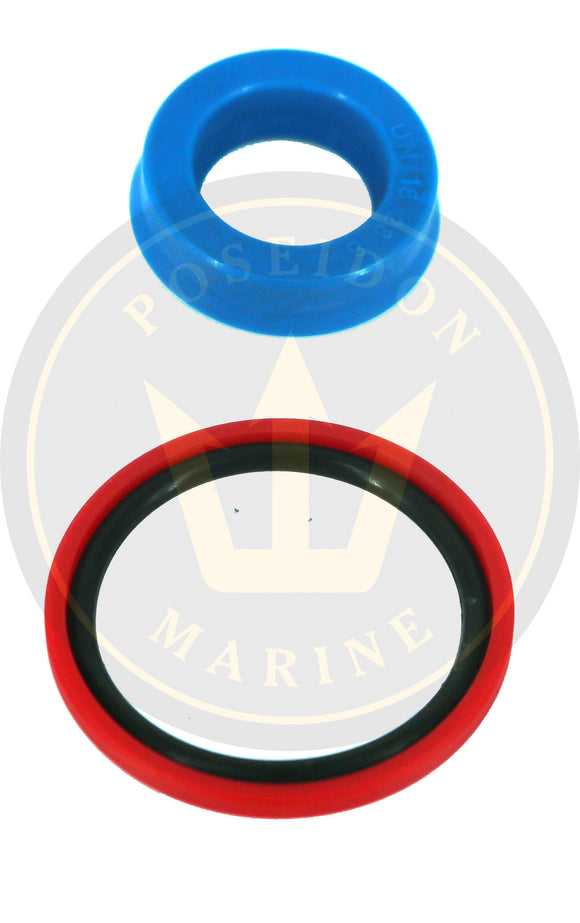
- One composite bidirectional seal that replaces the old split ring + O-ring design.
- One trim cap pressure seal (red) and an O-ring 3.5mm X 19mm, which is the original design that seals the trimming ram. You can choose one of the two.
- A trim cap dust seal.
- A trim cap sealing O-ring.
- Four trim hose O-rings. -
Installation of Volvo Penta SX/ OMC Cobra trimming cylinders:
- The trim cylinder bushing is pressed into the holes on each side of the gimbal ring. The bushings are installed into the outer side of each cylinder. Although it is not necessary for the bushings to be replaced unless they are worn excessively or damaged, replacing them may be considered while everything is apart, even if they are not worn out.
- The forward pivot pin is cleaned and then coated with grease. A light coat of Gasket Sealing Compound is applied to the threaded ends of the pin, and it is then centered in the ring.
- The cylinder is aligned and then pressed onto the pivot pin very carefully. A few taps with a rubber mallet may have to be given.
- On cylinders with lock nuts, the washers and then the nuts (new!) are installed. The nuts are tightened until an equal amount of thread is exposed on each side of the pin, and then both nuts are tightened to 32-34 ft-lbs. (43-46 Nm) on 1989-93 models, or 10-12 ft-lbs. (14-16 Nm) on all others. On models using the e-clip, the washer is installed, and then the e-clip is installed into the groove on the pin. The plastic caps are replaced.
- The new O-rings are coated with hydraulic fluid and then installed into the grooves on the end of each hydraulic line fitting. The plugs are removed, and each line is attached to its respective fitting on the cylinder. Each fitting is tightened to 14-18 ft-lbs. (19-24 Nm) on 1989-93 models, or 84-108 inch lbs. (9.5-12.2 Nm) on all others, with a flare wrench.
- The aft line retainer is installed, and the bolt is tightened securely. Also, on these models, the cylinder cover is positioned and installed.
- The retainer is installed, and then on all models, the ground strap is installed and the bolt is tightened securely.
- The aft pivot pin is thoroughly cleaned and then coated with grease.
- It is ensured that the grounding clips are in position, and then the bushings are pressed into the end of each cylinder and the bore in the drive unit. As was done with the forward-end bushings, replacing the bushings is suggested as preventative maintenance, although reusing the old bushings is perfectly acceptable as long as they are in good shape.
- The cylinder ends are aligned with the bores on each side of the drive, and then the pivot pin is inserted into one end and pressed through until it comes out the other side—a few taps with a mallet will probably have to be given.
- The flat washers and lock nuts or E-clips are installed. On models with nuts, the nuts are tightened until an equal amount of thread is showing on each side, and then each nut is tightened to 32-34 ft-lbs. (43-46 Nm) on 1989-93 models, or 10-12 ft-lbs. (14-16 Nm) on all others. The plastic caps are installed.
- The reservoir is filled with Power Trim & Steering fluid, and the drive is run through its full range of motion at least 5 times to purge any air in the system. -
Supplementary parts that are regularly replaced during the removal of the trimming cylinders?
- Insulating grommets 3853424 and bushings 3853423 (Early and late models)
- Cover 3852958 (Early models) or cover 3857522 (Late models)
- Nut 3852648 (Early models) or E-ring 3857521 (Late models)
- Washers 3852573 (Early models) or 3857588 (Late models)
- Pivot pin 3853422 (Early models) or 3857431 (Late models)
- Trim line O-rings for both models 3852165 -
Which Volvo Penta trimming cylinders can use this kit?
- The so-called “Early” models of Volvo Penta SX-C, SX-R, and OMC Cobra with references 3852414, 3885196. These cylinders are identified as “with AFT connections”.
- The “Late” models of Volvo Penta SX-M, DP-SM with references: 3857470, 3857471. These cylinders are called “with Fore connections”.